How To Force Your Site Visitors to Use Shared SSL Connection
From time to time, our technical support department is asked how to direct website visitors…

 admin
admin

In this tutorial, we will see how to create multiple instances on a dedicated server with OpenVPN!
Now we will see the configuration part:
The only prerequisite is that this configuration uses a different DHCP range and a different port. It is necessary to change the following lines:
– port 443
– Server 10.9.0.0 255.255.255.0
Left a configuration file for port 443 and right for port 80:
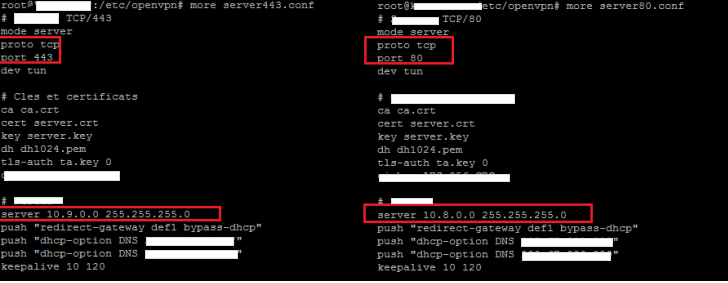
So there would be no conflict between the two configuration files. Thereafter it will add new iptables to allow the new VPN NAT:
iptables -t nat -A POSTROUTING -s 10.9.0.0/24 -o eth0 -j MASQUERAD
Thereafter we can ensure that both configurations are functional:

With this configuration management, the management of your VPN will be more flexible!

Explore more hosting insights, tips and industry updates.
From time to time, our technical support department is asked how to direct website visitors…
The aim of this article is to present two types of solutions offered by Microsoft…
PHP Warning: PHP Startup: Suhosin Extension does not officially support PHP 5.2 and below anymore,…