Cloud Web Hosting Applications
Cloud web hosting has changed the way websites and applications are deployed and managed. Instead…

We’ve come across many enthusiasts, noobs & testers who’ve enquired about the ways to setting-up WordPress on a Windows-based PC. So, for those who aren’t aware, setting-up WordPress locally would mean setting up a local server or a local host. There may be a number of reasons why anyone would want to do that in the first place.
Some might be a theme developers who’d probably want to test the theme locally before making it live over the web, while others might be developing a plugin for WordPress that they’d like to test run before releasing it to the store.
Here we’ll try to learn the ways to install WordPress on your Windows computer using WAMP.
But before we proceed with the steps, it’s important for your to understand that if you are setting up your WordPress-based site locally, it’d be only you or anyone who is using your machine who’d be able to view the website/plugin/theme. If you intend to make it live over the Internet, then you’d need to consider hosting it over a web server.
Well, if in case you do not know about what WAMP is, then it’s a compilation of Apache, PHP, and MySQL bundled together for the Windows OS platform. You’d require this to set up a local environment for WordPress installation over Windows. You may even choose to use a similar client such as XAMPP.
First and foremost, you must visit the WAMP Server website and download the latest copy of the software. Depending on the OS version and the bits (32-64) version, you must download the appropriate copy of the package onto your local machine.
After the download is complete, run the setup program and simply follow the instruction that the wizard produces. During the installation, it’d ask you to choose the destination of the default web browser. As a default feature, it’d automatically find the location of Internet Explorer, but if you choose to use a different browser, you must mention it over here, ie. the path (it is usually found in the program files folder).
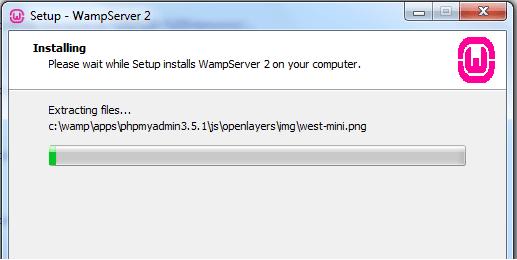
After the installation is complete, you must launch the WampServer.
As a default feature, you’d get phpMyAdmin. In order to create a database for WordPress you must click on the Wampserver icon found at the Windows taskbar and then click on phpmyadmin.
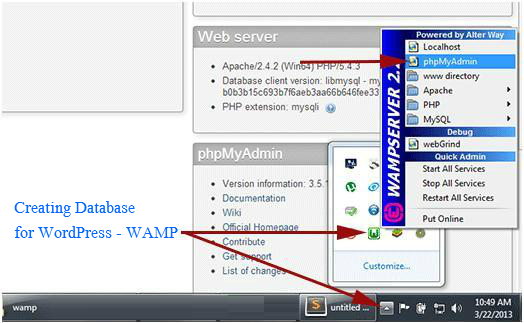
You’d be presented with a new window of phpMyAdmin, after which you must click on Databases and build a new database. You may choose a custom name based on your preference and click on Create button.

Once the backend set-up is complete, you must now download the latest copy of WordPress from its official website. Extract the contents of the folder. Go to the destination where you’ve extracted the content, copy the entire WordPress folder and paste it into C:\wamp\www\ (this is the default installation location, you should change it if you’ve installed it at a different location). You have the choice to rename the folder to anything of your choice. Here we’ve changed it to ‘my site’ for explanation purposes.
You must now access the following URL from the web browser of your choice :
http://localhost/mysite/
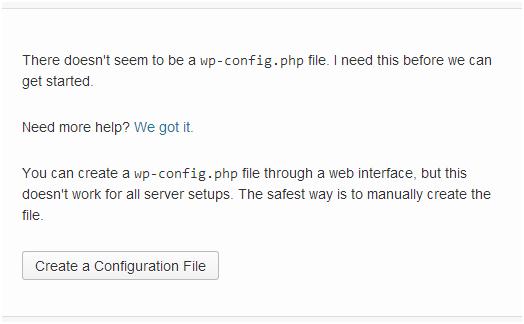
You might run into an error that states that the wp-config.php file could not be found. In that case, you must click on the Create a Configuration File button and build it.
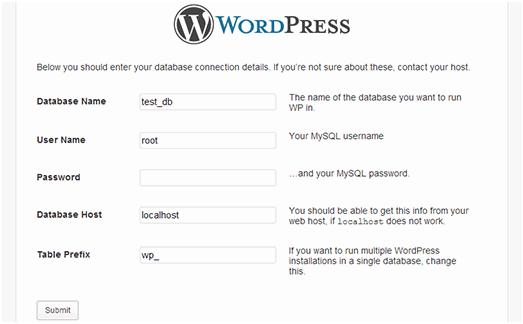
You are now required to provide the database information, which is the next step of WordPress installation. The database name field should be populated with what you had created in the previous stage of Creating a Database for WordPress.
As a default feature, WordPress would populate the Username field with ‘root’, but the password is something that you’d need to specify manually. Though, you may choose to leave it blank because it’s a local installation. If it’d have been over the server, you should populate the field with an authentic password. Click on the Submit button and WordPress will create a configuration file for you.
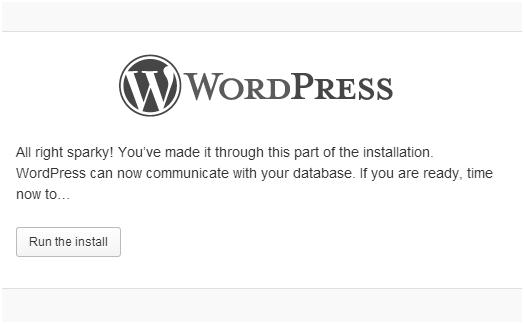
You’d then be presented with a screen confirming about the installation of WordPress. You must now run the installation by clicking the Run Install button.
Now, give a title to your site, choose the username, password and add the email address and hit the Install button.
This completes the installation process of WordPress on your PC running Windows OS using WAMP. Once you are done with testing your site over a local server environment, you may then choose to make your website live over a web hosting server.
Explore more hosting insights, tips and industry updates.
Cloud web hosting has changed the way websites and applications are deployed and managed. Instead…
In today’s fast-paced digital world, the right cloud infrastructure is the foundation of a successful…
Are you looking to secure your WordPress site? You are on the right place. Nowadays,…