We’ve explained in this article how to transfer reseller accounts. Read the article and follow the Transfer Reseller Accounts process.
The Transfer Tool in cPanel is a useful feature that makes migrating cPanel accounts between servers a little easier. You’ll need root (administrative) access to the cPanel server where you’re migrating accounts to use this method. On the remote server, you’ll also need some kind of user access.
Note- Accounts transferred from several common control panels to cPanel.
cPanel •Plesk • DirectAdmin • Ensim
However, we’ll assume you’re moving accounts from another cPanel server with root (administrative) access for this post.
To begin a root-level transfer of multiple cPanel accounts, you’ll need to gather the following information:
Information for the destination cPanel server’s root login. This place where the transferred accounts stored.
The source cPanel server’s root login credentials. This where the accounts migrated from.
A list of all the accounts you’ll be transferring (unless you plan on migrating all of them).
You’ll need a list of hosting packages to migrate from the source server to the destination server (if any).
Once you have these details, you can begin the migration process on the destination server by using the Transfer Tool in cPanel.
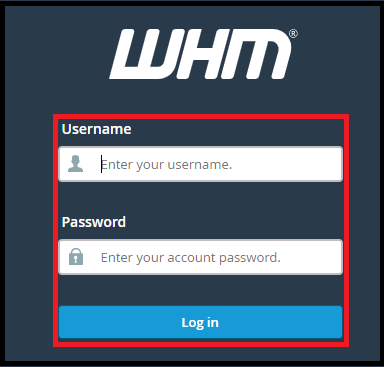
As the “root” user, log in to WHM on your destination server.
After you’ve signed in as root, go to the sidebar search box near the top-left of the screen and type “transfer tool” into it. Go to the Transfers section of the WHM sidebar and click on the Transfer Tool object.
Go to the Transfers section of the WHM sidebar and click on the “Transfer Tool object”.
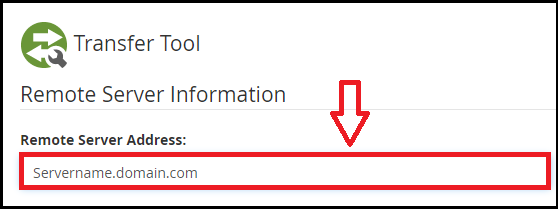
The Transfer Tool will appear in the main section of the WHM interface. The Remote Server Address is the first piece of information you would enter. This Fully Qualified Domain Name (FQDN), such as servername.domain.com, or the source server’s IP address (the location the accounts migrated from).
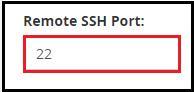
Enter the SSH port of the source server. cPanel automatically fills in the default SSH port of 22, but you can change it to any custom SSH port the source server uses if appropriate.
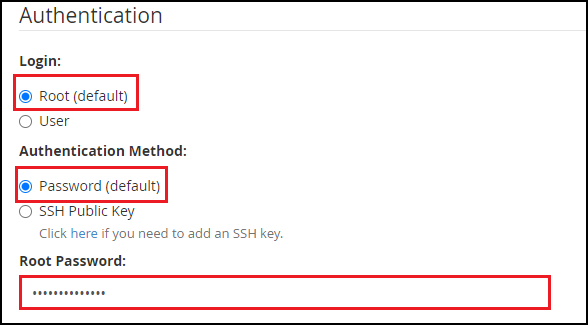
You must now enter your source server login credentials. To find out what you’ll need to specify, click one of the tabs below.
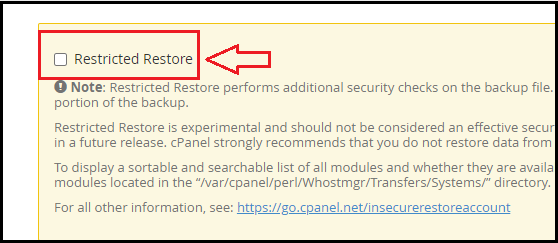
Do not select restrictive transfer, this will prevent reseller permissions from being transferrable no matter if you select the checkbox or not.
When you’re sure you’ve entered everything correctly, click the Fetch Account List button, and your destination server will try to connect to the source server and retrieve some account information. This will not initiate any account transfers.
Be patient as the process of retrieving account information can take some time. When done, the screen will change in order to display information on the source server regarding the accounts and resources. Here’s an example of the latest screen (click to see it in full-screen mode): Note- If the connection fails, please check the details you provided above to ensure the correct and check your firewall to make sure that inbound and outbound connections permitted on the remote SSH port you specified.
As part of the process of fetching account information from the source server, the Transfer Tool will also attempt to compare the cPanel versions on the source and destination servers (assuming the source is also running cPanel). If a discrepancy noticed, the Transfer Tool will inform you at the top of the screen in a yellow box.
You can view all packages set up on the Source Server in the Packages section of the Tool Transfer, and also the functionality of these packages. It is a good idea to transfer these packages if you do not already have these packages on your destination server. The Transfer Tool still copies accounts with proper source server settings and restrictions even though you do not copy the packages, but making it more complicated to change those accounts after the migration done.
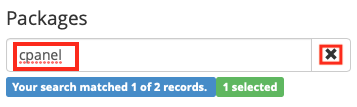
At the top of this section, there is a search box that can help you find the specific packages you are looking for (which can be handy if there are lots of them). Start typing what you want to search for in the box and only the packages that match that displayed. If you want to clear your search and see all packages again, click on the X to the right of the search box.
If you have a lot of packets, use the Page Size menu above the right of the Packages section to navigate between pages or change the number of shown packages per page. Changes are immediately applicable.
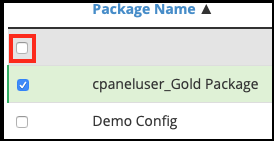
To ensure the Transfer Tool copies the packages you want, you’ll need to check each of the packages. You can do that individually, or click the checkbox in the grey header just below the search box to select all of the visible packages. If you select a package with a name that already exists, you warned about the conflict.
All hosting accounts listed in the Account section. Just like the packages in the above section, you will select every account that you want to copy. Both sections have similar features and we focus on what distinguishes the accounts section (click to full-size view):
When you select an account checkbox, the Transfer Tool will verify if that account’s username is unique on the destination. If you already have an account with the same name on the destination, you will be warned and you can choose to overwrite the existing account if you want.
For accounts, you not only select which ones to transfer, but you also specify features to use or specific types of data to copy. The Transfer Tool automatically enables copying certain types of data for the accounts you select, but you can add or remove options as you see fit.
Dedicated IP: This allows you to assign that cPanel account to a dedicated IP address if you want. The source account does not have to be on a dedicated IP address for it to be assigned by you to a dedicated IP address on the destination, but the Transfer Tool will attempt to detect if the source account is on a dedicated IP address and will automatically check this box in that case to ensure the account will remain on a dedicated IP address on the destination server.
Reseller: This will show you who owns that particular cPanel account. Any account not owned by a reselle owned by “root.” You cannot change reseller ownership during the transfer itself. If you need to change ownership, you will need to do it after the transfer is complete.
Copy Home Directory: This copies the home directory files for the account (typically located at /home/CPANELUSERNAME). If you plan to manually migrate that data later, you uncheck this item and the account created, but no home account data will be migrated. It checked by default.
Copy Reseller Privileges: This will copy over the reseller account permissions and settings from the source server to the destination server. This automatically checked if the user is determined to reseller. Checking this item does not make a regular cPanel account into a reseller if it isn’t one already. You’d need to set that up after the migration is complete.
Copy Databases: If you want the Transfer Tool to automatically copy over the account’s supported databases from the old server to the new one, make sure this box is checked. This is checked by default. If you plan to manually migrate databases later or if the user doesn’t want their databases migrated, uncheck this item.
Copy Bandwidth Data: If this item is checked, cPanel will copy over the bandwidth usage information it keeps track of for that account. It is checked by default. If you’d prefer to give the user a fresh start, uncheck this item and cPanel will set the account’s bandwidth usage to zero on the destination server.
Express Transfer: If you enable this, it will make a number of DNS and redirect changes on the source server once the account successfully transferred. It will also suspend the account on the source server after successful migration. These changes will help to ensure visitors go to the new location for the account as soon as possible. You should review the information here if you plan to use this feature.
Overwrite: If an account with the same cPanel username exists on the destination server already and you check the Overwrite option, the existing account on the destination server will automatically be overwritten by the account you are migrating from the source server. Only use this if you are certain the account on the destination server is the same as the one on the source server.
18. If you are certain you’ve selected everything properly, you can click Copy to actually start the transfer process
19. The display will upgrade to show the progress of the transfer in real-time. The whole transfer process multi-threaded (unless you have in the above-advanced section reduced transmission and restoration threads to 1) so that this scenery separated into three areas that automatically update. Transfer progress (source server retrieval data), restoration progress (the transfer of data to the appropriate locations on this server), and a summary section at the bottom (click to view full size):
20. This screen must not be kept open until the transmission over or even your browser. It will now go on in the background until it canceled or completed. To view or abort an existing transfer, you can return to the W HM WTM transfer tool option, and the command-line tool /usr/local/Cpanel/bin/view transfer allows you to view the status.
21. The synopsis will show the success or failure to transfer or restore each item. It will also display warnings for things that you should know are not a failure. You find, for example, whether a function enabled on the source server disabled on the destination, so the transferred account not enabled.
Feel free, you transfer accounts from one server to another successfully! However, if you still face difficulties with the above procedure, feel free to proactively support the bodHOST team.