How to Manage Disk Space in Plesk Control Panel
To manage disk space in Plesk is simple and ensures that resources are allocated efficiently.…

Note: this option is available on Windows Server 2012
The service DHCP is ever present in companies’ networks to distribute a network configuration to clients’ computers and even servers. Generally, multiple servers are present in order to make sure the availability and stability of the service. These servers manage a lot of things along with synchronization and avoid duplication.
Now just imagine that an unknown DHCP server just connects to your network for malicious activity, without knowing its presence. You may distribute the bad IP configuration and that will greatly disrupt your network.
Especially, in the operation of the DHCP protocol, a client negotiates with the first DHCP server that therefore addresses him and simply responds as a malicious DHCP server before yours and before you know it.
Moreover, one can imagine a non-production environment as a test virtual machine running a DHCP server. If it’s found accidentally connected to the network, disruption will also take place.
For this, Hyper-V provides a feature called DHCP Guard or DHCP Protection. When activates on virtual machines, prevents you from sending frames to type DHCP offer and therefore makes a suggestion for IP configuration to a potential customer.
So, how to enable cookies? How to enable it by default? How can you quickly configure multiple virtual machines? Today, we will try to find these questions’ answers.
Enabling this option
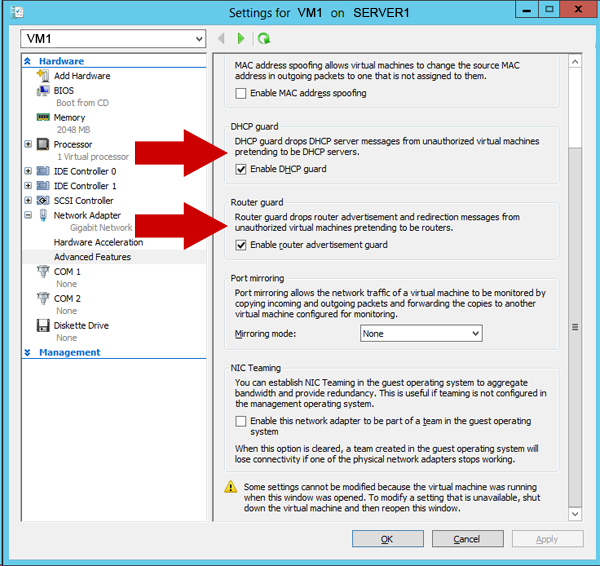
The option can be set on each virtual machine step by step and case by case basis, see how:
Note: Do not enable this option on a virtual machine which is a legitimate DHCP server, otherwise it will not deal with customer demand.
Start by opening the Hyper-V and select one of your virtual machines that do not have to send DHCP offer type frames, i.e. machine which does not act as a DHCP server on your network.
It remains only to repeat the process on the other VMs on which you want to enable this protection.
Note: To activate the default DHCP Guard, you must specify this parameter in a template when you use System Center Virtual Machine Manager.
Activation on multiple machines
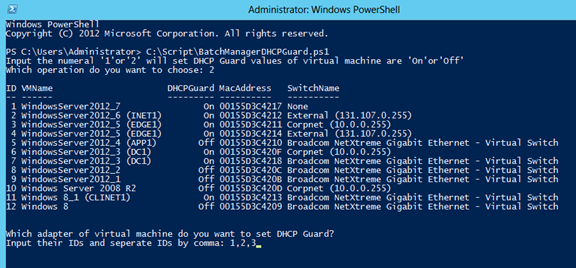
With the GUI, it can become quickly look long and tedious to perform the configuration on each of your VMs. To counter this, you can go through PowerShell. Start by opening a PowerShell console and loading the Hyper-V module:
Import-Module Hyper-V
Then start listing all the VMs listed in the inventory of your Hyper-V server, adding a column that lets you know the status of the DHCP Guard setting.
get-vmnetworkadapter * | select vmname, dhcpguard vmname
To enable the DHCP Guard on all the VMs:
set-vmnetworkadapter * -dhcpguard on
To disable it on all the machines
set-vmnetworkadapter * -dhcpguard off
If just want to make these changes on one or two VMs, then replace the sign * with the name of specific VMs; in case there are several names to be specified, then you can use commas.
Incoming searches related to hyper-v DHCP guard
Explore more hosting insights, tips and industry updates.
To manage disk space in Plesk is simple and ensures that resources are allocated efficiently.…
How to Create a Mail Account in Plesk is the topic of this article. We’ve…
This guide illustrates how to manage FTP accounts in Plesk. It allows you to control…