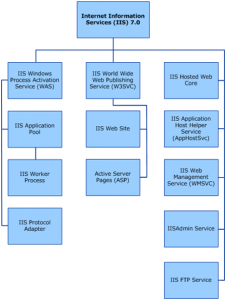
IIS is a Web server produced by Microsoft. This IIS will only run on computers using a Windows operating system. Microsoft Web servers are used by approximately 20% of all Web sites. It is the world’s second most popular web server in terms of overall websites, behind Apache HTTP Server. Internet Information Services (IIS) makes it easy for you to publish information on the Internet or your intranet.IIS includes a broad range of administrative features for managing Web sites and your Web server. With programmatic features like Active Server Pages (ASP), you can create and deploy scalable, flexible Web applications. IIS is not installed by default but can added using the Add/Remove Programs dialog box from the Control Panel.
How to Install Internet Information Service (IIS)?
- Insert your Windows XP Professional CD-Rom into the disc drive.
- Go to Add or Remove Programs: Start > Control Panel > Add or Remove Programs
- Click on the Add/Remove Windows Components button on the left hand side of the window.
- The Windows Components Wizard will then appear. Scroll down to Internet Information Service (IIS) tick the check box and click next.
- If you do not have Windows XP Professional in your disc drive you will asked to insert it at this point.
- The installation should now begin, you will prompted once the installation complete, then click finish.
- You will now be able to view your home page in a web browser by typing http://localhost into the address bar.
- You should now be looking at the IIS documentation.
Your default web directory for your website files is C:\Inetpub\wwwroot you can set up your own virtual directory through the Internet Information Services Window:
- Go to Administration Tools: Start > Control Panel > Administration Tools
- Double-click on the Internet Information Services icon.
- To add a new virtual directory, expand the Web sites folder in the left pane of the window and right click on Default Web Site. Select New from the pop up menu followed by Virtual Directory.
- The Virtual Directory Creation Wizard should appear, click next.
- You will then prompted to give your virtual directory an Alias to access the it from your web browser (this is the name you will type into your web browser after localhost/ to view any web pages you place in the directory).
- Click Browse to assign the directory location of server files then click next.
- Lastly you will see a series of boxes, this is for security. If you not worried about security select them all and click next.
- Once the virtual directory created you can view the web pages in the folder by typing http://localhost/alias into the address bar of your web browser
